Showing posts with label Dessert. Show all posts

Sunday, July 15, 2007

Mini Cakes

A mini dessert


Just a quick update to let you know I'm still alive. There has actually been some baking going on, I'm just too lazy to upload the pictures and type up recipes. Instead I thought I'd post these photos from about a month ago, don't know why it's taken me so long to put them up.
I bought these amazing mini cake tins in TkMaxx and had to try them, so I just made four mini sponge cakes (same as ever). I think they worked really well, the little slices looked so cute on the plates, plus it lets you try out lots of different icings and fillings at once.

Berries rock for decoration


This is Emiy demonstrating how tiny a slice was ^_^

Cakes together!

Sorry about the picture quality, it's really crappy. They were taken at, like, twelve o'clock so I only had crappy kitchen lighting. Oh well.

And again

They don't look so small on their own

And that's the end of that...


Tuesday, July 3, 2007

Curd Cheese Tart and Custard Tartletts

We finally had a bit of sun... for about five minutes...

Thank you library. I told you there's be more baking, didn't I ;) After much deliberation I decided that I'd try making a dessert from 'Desserts: A Lifelong Passion' by Michel Roux. This book is swish, all the recipes are so, well, fancy! It's definitly a more advanced cookbook, he expects you to know what he's talking about in his recipes, there aren't really any explenations of how to go about creaming things etc. Still, once you know the basics there's really no need for that. The pictures in it are spectacular and all the recipes sound so good, I never want to have to bring it back >_<

The icing sugar kinda dissolved in the middle

I've been wanting to bake a cheesecake for ages, and although this isn't quite what I had in mind it came close enough. I was a bit worried that it wouldn't set properly, the mixture just looked so liquidy. But it all worked out well in the end. I made some pastry a couple of weeks ago from some fat that was about to go off and froze it, so I got a chance to move some of that out of the freezer too :)
The only modification I made to this recipe was to substitute ordinary shortcrust pastry for his sweet pastry, it sounded like it would have been overpoweringly sweet. I think this was a change for the better, though if you're a big fan of sweet things then you might like it that way. He also suggests using puff pastry if desired.


I didn't threaten to fall apart when I took it out of the tin, to my relief


Recipe: Curd Cheese Tart

Ingredients:

  • Shortcrust Pastry (see recipe here)
  • 150g soft curd cheese (fat content of your choice) (I used cottage cheese)
  • 50g caster sugar
  • 150ml milk
  • 3 eggs, separated
  • Juice of 1 lemon
  • Zest of 1 lemon, thinly slivered and blanched
  • 20g flour, plus extra for dusting
  • 30g cornflour
  • Icing sugar, for dusting

Method:
  1. On a lightly floured surface roll out the pastry to about 2 mm thick. Use it to line a 22cm/ 8 1/2 inch loose-bottomed pie dish.
  2. Refrigerate until firm. Line with tin foil and baking beans. Bake blind in an oven at 200 degrees Celsius for 15 minutes. Leave to cool.
  3. Preheat the oven to 180 degrees Celsius.
  4. In a bowl, whisk together the curd cheese, sugar, milk, egg yolks, lemon juice and zest, flour, and cornflour. Beat the egg whites stiffly and delicately fold them into the mixture with a spatula.
  5. Fill the pastry case with the mixture and bake in the oven for 20 minutes. Reduce heat to 150 degrees Celsius and bake for a further 15 minutes.
  6. Take the tart out of the oven and place it on a wire rack to cool for five minutes. Remove from tin and leave to cool completely.
  7. Dust with icing sugar. Serve cold, but never chilled (this will destroy the flavor).

It reminds me of mountains

The thing that impressed me most about this recipe was that fact that it contained so little fat. I'm not saying it's sin-free or anything like that, but for such a creamy tasting dessert it has very little in it; no butter, no cream, just some cottage cheese which isn't exactly indulgent :P If you wanted to make it richer you could use a curd cheese that has a higher fat content, but I really don't see the need to.
The texture is like a baked cheesecake, and the lemon flavor is very subtle, I think I would like it a bit stronger but my mum, the one who wanted it, says it's supposed to be like that, so I guess I can't argue. It wasn't complicated to make, again I was just afraid that it wouldn't set, but it obviously did. It started browning quite early on and needed to be covered with tinfoil, otherwise I would have ended up with what would have looked like a burnt cloud!


Overall, it was a success :)


Then the sun left

I still had some defrosted pastry left over from the tart, there was no point in waisting it, so I made custard tartletts! Not exactly complicated, but they're still really nice.


I love these little foil cups

Ummm, I can't really post a recipe for them. All I did was line the foil cases with the leftover pastry, baked them blind for about 10 minutes at 200 degrees Celsius, removed the foil and beans, reduced the oven to 150 degrees, and continued to bake them for another seven minutes or so until they browned. Then I just made some thick Bird's custard in the microwave and filled them with it. Top with berries, leave to cool, and enjoy!


Until next time...


Tuesday, June 26, 2007

Devil's Food Cake

Almost there, but not quite...

My quest for the perfect chocolate cake recipe continues. My goal? To bake a chocolate cake that is better than Betty Crocker's Devil's Food Cake Mix. No matter how many chocolate cakes we've had in my house none of them compare to it. It annoys me so much >_<> my loyal bags of flour sitting in my baking cupboard, and yet any time the words chocolate' and 'cake' are mentioned Betty Crocker is all anyone can think of, alhough admittedly it is amaing cake. What makes it so good is the moistness of it, it has the perfect cake texture. I've baked cakes that are just as chocolaty at it, but they haven't got that 'omg, it's squishy good!' quality about them.

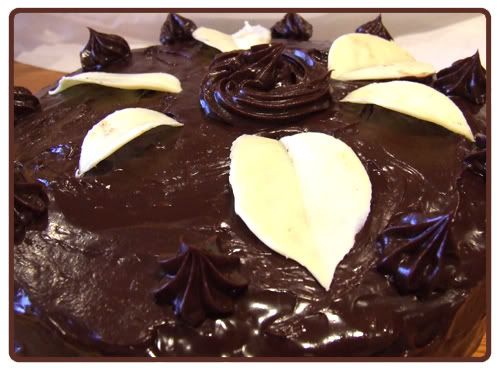
The icing reminds me of the cake in 'Matilda'

I came soooo close with this one, but again it just wasn't there. It was damn good chocolate cake though, just the right amount of chocolate, and it was very moist. Plus it was eaten between four people in less than two days, so I'll take that as a compliment. I think this is probably the best chocolate cake I've made so far, and hopefully the standard will keep going up...

Piping sets are so much fun :)

The recipe came from The Australian Women's Weekly 'Chocolate Cakes', a really adorable little book with about 50 cake recipes in it. I can't get over how wonderful all their books are. The recipes are simple to follow, don't involve too many complicated ingredients, and the pictures always make my mouth water. I have to get more of these books - that's the other thing that's so great about them, there are so many different collections. I think I'll buy the 'Cheesecake' or 'Cookie' collection next.
The book suggests baking the cake in two separate deep 20 cm tins to make a tall cake, filled with cream and topped with chocolate icing. I decided to bake it all together in a 23 cm cake tin (mainly because I didn't have two 20 cm ones), and I think this makes for a better shape if you're not planning on filling the cake, which I didn't. I made a LOT of chocolate ganache with the chocolate left over from my melting disaster with the Chocolate Mousse Cake, it's really rich so just covering the cake with it is more than enough, if it was filled it would have been way too much.

An inside look

Recipe: Devil's Food Cake

Ingredients:

For the cake:
180g butter, chopped
385g caster (superfine) sugar
3 eggs
225g self-raising flour
75g plain flour
1/2 teaspoon bicarbonate of soda
70g coca powder
3 teaspoons instant coffee powder
1/2 teaspoon red food colouring
125ml water
125ml milk

For the Ganache (this makes a lot):
300g good quality dark chocolate, chopped
200-250 ml cream (depends on how thick you want it)

OR

300 ml cream, whipped
60g dark chocolate, chopped
60g butter, chopped

Method:
Preheat the oven to 180 degrees C/ 350 F. Grease two deep 20cm round cake tins (or one large, deep 23 cm tin); line bases with baking parchment and grease the parchment.
Beat the butter and sugar in a small bowl with a electric mixer until light and fluffy; add eggs, one at a time, beating well after each addition.
Transfer the mixture to a large bowl; fold in sifted flours, soda, and cocoa powder with combined coffee, colouring, water, and milk, in two batches. Pour mixture into prepared tins.
Bake in oven for about 45 minutes. Turn cakes onto wire racks to cool.
To make the ganache, melt the chocolate with the cream in a bowl over a pan of simmering water, taking care that the water doesn't boil or touch the bowl. Leave to cool in fridge until mixture reaches desired consistency, stirring occasionally, about 15-20 minutes.
Spread ganache over cake and use excess to pipe decoration.

OR

Join cakes with whipped cream.
Make the chocolate icing. by melting together the chocolate and butter over a pan of simmering water. Remove from heat. Cool to room temperature until spreadable. Top cake with icing.

Now how could I not lick the spoon?

Like I said, these was pretty fantastic cake. I think the ganache worked really well with it, and I love the shiny appearance it gives. The chocolate leaf decorations were really fun to make; All you do is paint non toxic leaves with a thin layer of melted chocolate, wait for it to set, and then peel away the leaves. It's not complicated, but I think it gives a professional looking touch ;)
Apologies for the lack of American measurements, they weren't given in the book. But I'm more than happy to look them up if anyone wants them, all you have to do is ask.
Now, here's the part where I need your help; I'm begging for your best chocolate cake recipe, the one that everyone always asks you to bake, the one that is so frakking good (yes, I'm a B.S.G fan) that it makes you want to eat the whole thing. I know I can find a better cake than the Betty Crocker, I just know it...

Thursday, June 21, 2007

Chocolate Mousse Cake and Lemon Meringue Pie


Cream, cream, and more cream!

Oh dear, I defiantly need to work on keeping my cool when baking goes amiss. Seriously, I let myself get way too worked up over these things. Note to self: RELAX!
My sister, Emily, was having a "fancy" dinner party the other night with some of her friends, and I said I'd do the desserts. After much deliberation I decided to go with Chocolate Mousse Cake, because there aren't many people out there who don't like chocolate, and Lemon Meringue Pie, because she is addicted to it. I've made the Lemon Meringue before so I wasn't too worried about that, and I figured that the Chocolate Mousse would be fine because I would have it made the night before.
The long and the short of it is that we didn't get all the ingredients the day before the party, and I got sick :( I did manage to get the cake for the chocolate cake made for the mousse filling the night before, but that was the easy part.
In the end she ended up buying a box of lemon pie filling (I DETEST baking that comes from boxes) so the pie got put together pretty quickly without much bother. Then came the mousse time *shudder*.
I got to the stage where I was meant to melt the chocolate and sherry together over a pan of boiling water, I usually melt chocolate in the microwave so off I went. The chocolate melted fine and then I added the cold sherry to it. Big mistake. Melted chocolate + cold liquid = very bad idea. I freaked out, mainly because I'd just wasted about 100gs of Lindt chocolate. So I sent my dad to get more chocolate and started again, melting the sherry and chocolate together at the same time. It happened again, the mixture sort of seized and wasn't really a liquid, I figured it was the microwave that was messing it up. I freaked out again, got a third batch of chocolate, and decided to melt it over a pan of water like the recipe said. It still wasn't turning into liquid, and I was convinced that there was something wrong with the sherry that was messing it up.
In the end it turned out that that is just what happens to chocolate when you melt it with sherry, and it loosens once it is mixed in with the rest of the ingredients :P Oh well, I've learned my lesson: Must NOT panic.

The recipe for the Lemon Meringue Pie doesn't really come from anywhere since it was using a box mix. It's just a basic biscuit base, filled with the pie filling, and topped with meringue. Easy, but it makes a damn good dessert.
The Chocolate Mousse Cake was from 'The Women's Institute: Chocolate'. This is the first time I've baked anything from this book, and I can't say I was blown away. But I think I'll have to try a few more recipes from it before I pass judgement because there are some really nice sounding recipes in that book that I'd love to try sometime, plus the pictures are amazing.

It kinda looks less graceful once you cut it...

Recipe: Chocolate Mousse Cake

Chocolate Cake:

Ingredients:
4 eggs
115g caster sugar
100g plain flour, sifted

15g coca powder, sifted
40g butter, melted

Method:
Preheat the oven to 180 degrees c. Grease a 20 cm (8 inch) cheesecake tin or loose-bottomed tin and line the base with baking parchment.

Place the eggs and sugar in a large bowl over a pan of hot water. Whisk them for 10 minutes, until the mixture is thick and creamy. Remove the bowl from the heat and continue to whisk for one minute.
Sprinkle the coca powder and flour over the surface and fold them in gently with a metal spoon using a figure of eight action. When they are nearly all incorporated, add the melted bu
tter and mix it in.
Pour the mixture into the prepared tin and bake for 25-30 minutes until the cake has risen, is firm to the touch, and coming away from the sides. Allow to cool in tin for 5 minutes and then remove to wire rack. Slice it in half horizontally.

Chocolate Mousse:


Ingredients:

150g dark chocolate, broken into pieces
1 tablespoon sherry
1 teaspoon gelatin powder

3 eggs, separated
150 ml whipping cream, whipped to soft peaks
50g caster sugar
2 tablespoons chocolate spread
150 ml whipping cream, whipped, to decorate
Coca powder, to decorate

Grated Chocolate, to decorate

Method:

Place the chocolate and sherry in a bowl set over a pan of hot water and allow to melt, stir and leave to cool.
Put 1 tablespoon of cold water in a medium bowl and sprinkle the gelatin over. Leave for a few minutes and then place the bowl in a larger bowl filled with hot water and stir to dissolve
the gelatin. Allow mixture to cool and beat in the egg yolks, one at a time, followed by the melted (don't worry, it won't be very liquidy) chocolate and cream.
Whisk the egg whites until they are fairly stiff and continue to whisk while adding the sugar a tablespoon at a tine. Add 1 tablespoon to the chocolate mixture to loosen it, then carefully fold in the remaining egg whites.
Smooth the chocolate spread over the bottom half of the cake and place it back in the lined cake tin, chocolate spread side upwards. Spoon the chocolate mousse on top and place in the fridge to set, about 1 hour.
Place the other sponge on top. Spread the cream on top and decorate with coca powder and grated chocolate. Leave it in the tin until you are ready to serve (I don't think this is vital as mine was fine the next day).

I love dusting things with coca powder

Taste wise, the Pie was really nice. I know I say I hate box mixes, but I must admit it had a really good flavor (I think it was by Greens). It also sets really well so you don't get a big bowl of lemon squidgy rather than an actual piece of pie.
The Chocolate Mousse Cake didn't really live up to my expectations, mainly because of the cake. I know I made it a day in advance, but it was still a very dry cake without a whole lot of flavor. Granted the mousse was good, rich, chocolaty, and this really improved the cake when it was eaten with it. If I was to make it again I'd use the same mousse recipe but sandwich it between a better chocolate cake.
They were a big hit and everyone loved them, they were polished off the next day which is always a good sign.

Thursday, June 14, 2007

Angel Food Cake

So innocent!

Angel Food Cake is not very common in Ireland, I'd never even heard of it before I started baking, certainly never tasted it. But I had to do something with all those leftover egg whites from the Strawberry Tart, and so it seemed like an opportune moment to try it, the only other thing I could think of making was meringue and that wouldn't have been as much fun :)
I got the recipe from Cakes Galore, a really adorable book with some great ideas in it. I'll admit I'll probably never make most of the recipes in it, but I still love to look at it. I didn't modify the recipe but I did omit the icing, mainly because I didn't have that many egg whites to use.

It matches the board!

Recipe: Angel Food Cake


Ingredients:

50g plain flour
1 tablespoon cornflour
200g caster sugar
7 egg whites

3/4 teaspoon cream of tartar

Pinch of salt

1 1/2 teaspoons vanilla extract


Method
:
Preheat the oven to 190 degrees C/ 350 F. Grease and line a 23cm spring form tin with a tube base.
Sift the flour and cornflour in a bowl. Add 65g of the sugar and sift together twice.
In a separate large bowl, whisk the egg whites until foamy. Add the cream of tartar and salt and whisk until stiff.
Whisk in the remaining sugar until the mixture is stiff and glossy. Whisk in the vanilla extract.

Carefully fold in the flour mixture, then spoon the batter into the prepared tin and level surface. Bake in the oven for 45-50 minutes, or until pale gold and spongy to the touch.
Transfer onto a wire rack and leave to cool in the tin.

I must say I was pleased with the results, it was very strange, but in a good way. My sister said it reminded her of sponge trifle and I see where she was coming from. I was a little anxious taking it out of the tin, there was so little flour in it I was sure I was going to end up with a giant meringue. I think perhaps I baked it for slightly too long as it didn't have a great height, I was under the impression that it's meant to be quite tall?
Anyway, I think it tasted great, a brilliant way of using up egg whites and certainly more interesting than meringue. Plus there is no fat in it, which is always a good thing when you don't feel like indulging too much.
I just ate mine plain, my mum had it with clementines and said it was delicious. I suspect you could have this cake with just about anything you like, chocolate sauce and ice-cream would be nice (though it wouldn't be quite so innocent anymore). I will defiantly be making this again, though I may experiment with different recipes. And if anyone can tell my how tall these cakes are meant to be I'd really appreciate it :)

Wednesday, June 13, 2007

The Ultimate Jam and Cream

So simple, yet so good!

This has to be one of the best recipes I know! It is so quick and simple to make, and it's absolutely delicious every single time. There are so many different ways to serve it; With any type of jam and cream, with lemon curd, with chocolate icing, baked as cupcakes, with fresh fruit, the possibilities are endless. Decorating it is really fun because there are just so many things you can do with it.
The cake itself is incredibly moist and the smell when it comes out of the oven... it makes me drool every time.
The recipe comes from Delia Smith's 'Complete Illustrated Cooking Course'. I'm very fond of all her recipes, they tend to involve few ingredients and not too much time, but the result is always impressive. This recipe produces quite a small cake, which is fine if you're just making it for fun, but if it's expected to feed a group of people I'd double the recipe at least. It doesn't have to be baked in two separate tins, you can increase the cooking time and bake it in one tin either, just cover the top with tinfoil if it begins to brown too much.

There are so many ways of serving it......But I always end up filling it with jam and cream!

I returned to childhood decorations!

Recipe: All-In-One Jam and Cream Sponge

Ingredients:
110g self raising flour
1 teaspoon baking powder
110g soft butter or margarine at room temperature
110g caster sugar
2 large eggs
2-3 drops vanilla essence

Method:
Preheat the oven to 170 degrees C/ 325 F
Grease and line two 7 inch sponge tins, no less than 4 cm deep.
In a large mixing bowl, sift together the flour and baking powder.
Add all the other ingredients to the bowl and whisk them with an electric whisk till thoroughly combined. If the mixture doesn't drop easily off a wooden spoon when tapped against the side of the bowl and 1 or 2 tablespoons of warm water and whisk again.
Divide the mixture between the two tins, level off, and bake on a centre shelf for about 30 minutes. Remove from tins and leave to cool.

To Assemble:
A great way to serve this is to spread both half's of the cake with raspberry jam, place whipped cream on top of one half, and then sandwich together. You also have the option of then covering the entire cake with whipped cream for a richer dessert, but I think it's fine with just the filling.
As I said before, it's a good cake to experiment with, so try lots of different fillings. Lemon curd is delicious, even nutella works!

Tuesday, June 12, 2007

How could you resist?


Lemon Meringue pie has to be one of my favourite desserts, especially when made with a biscuit base. Pastry is good and all, but there's something about the crumbly texture that just works so well with the puffy meringue. The one thing I hate about making this dessert is that the meringue always ends up sliding away from the filling when you put a slice on a plate, and it ends up looking like a big mess >_< The recipe I used was adapted from Williams and Sonoma's 'Essentials of Baking'. Originally it had a pastry crust, but I substituted this for a biscuit base. Other than that I didn't make any changes. I like this recipe a lot, the lemon filling isn’t too sweet and the meringue is light and fluffy :)

I love the way droplets of water form on the meringue after it's cooled


Recipe: Lemon Meringue Pies

Base:

Ingredients:

200g crumbed digestive biscuits
4-5 tablespoons butter

Method:

Grease and line a 23cm ceramic pie dish. Mix together the biscuit crumbs and melted butter and press evenly into the base of the prepared tin. Baking in oven at 150 degrees Celsius/ 300 F for about ten minutes, or until golden brown. Transfer to fridge to cool

Lemon Filling

Ingredients:

6 tabelspoons/45g cornstarch

1 1/2 cups/ 375ml water

5 large egg yolks

1 3/4 cups/440g granulated sugar

1/2/ cup/125ml fresh lemon juice

2 teaspoons grated lemon zest

Method:

In a small bowl, combine the cornstarch and 1/2 cup/ 125 ml of the water and stir until the cornstarch dissolves.
In a saucepan, whisk together the egg yolks, granulated sugar, lemon juice, and remaining 1 cup/ 250 ml water until well blended. Whisk in the cornstarch mixture and bring to the boil over a medium heat whisking constantly, about 8 minutes. Boil for a further 1 minute until the mixture thickens and looks clear. Remove from heat and stir in the lemon zest. Using a rubber spatula, scrape the filling into a medium bowl and place plastic wrap directly on the surface of the filling to stop a skin from

Meringue:

Ingredients:

6 large egg whites, at room temperature

½ teaspoon cream of tartar

6 tablespoons/ 90g caster sugar

Method: In a large bowl, combine the egg whites and cream of tartar. Using a hand-mixer beat on medium speed until the whites begin to thicken. Increase the speed and beat until soft peaks form. Slowly and the caster sugar and continue to beat until stiff, shiny peaks form.

To assemble:

Remove the plastic wrap from the lemon filling and pour over pre-baked base. Using a rubber spatula, distribute the meringue evenly over the filling, moulding it upwards towards the centre, and forming swirls and peaks. Bake until meringue is lightly browned, about 12-17 minutes. Transfer to a wire rack and cool for one hour. Refrigerate until cold, at least 5 hours or up to overnight. Serve cold.

It’s really, REALLY important to keep it in the fridge for long enough, the lemon filling needs to get good and solid. It’s meant to be supported inside a pie-crust, but seeing as how I use a biscuit base it tends to ooze once cut, but in my opinion it’s worth it.


Monday, June 11, 2007

Heaven With Strawberries


Hello! First post in my new blog! I guess I should say some inspirational words about why I made it etc. Let's cut to the chase; I like to bake and take pictures, that's why I made it. I want to try and develop my skills and get feedback and comments from people who actually know what they're doing, and I just like to go on and on about things. So enjoy!

In honour of my new blog I baked a strawberry tart, it seemed appropriate. I have wanted to bake one of these for ages and now seemed as good a time as any, especially since they were selling two packets of strawberries for five euro in Dunnes. The recipe is taken from Williams and Sonoma’s ‘Essentials of Baking - which is one of my favourite baking books that I own. The recipes are really good and deliver exactly what they pro mice, plus the step by step instructions are really clear and easy to follow.
I altered the recipe slightly, using patisserie cream instead of the suggested mascarpone cream filling and I had to use vanilla essence rather than a pod as they are IMPOSSIBLE to get.

Filled tart case

The jam glaze really helps to brighten up the fruit

And a shot of the yummy, if not slightly squidgy, inside.

Recipe: Strawberry Tart with Patisserie Creme

Rich Tart Pastry:

Ingredients:

1 ¼ cups (200g) all-purpose flour

½ cup (60g) confectioners’ sugar

¼ teaspoon salt

½ cup (125g) unsalted butter, cold, cut into 2 cm pieces

2 large egg yolks

1 tablespoon cream

Method:

In a food processor combine the flour, confectioners’ sugar, and salt. Pulse one or two times to mix. Add the butter pieces and pulse 7-8 times until the mixture forms large, coarse, crumbs the size of large peas.

In a small bowl, lightly beat the egg yolks with a fork, then stir in the cream until blended. With the motor running, add the egg mixture and process until the dough begins to come together, but does not form a ball.

On a work surface, shape the dough into a 6 inch (15cm) disk. Wrap in plastic wrap and refrigerate until firm, at least 45 minutes.

Remove the disk from refrigerator. If it is too hard to roll out leave it to stand at room temperature for 10-20 minutes. Lightly dust a rolling pin and work surface with flour.

Roll out the dough and line a 9 inch (23cm) tart pan, using a double crust on the edges. Freeze tart until firm, about 30 minutes.

Preheat the oven to 200 degrees Celsius (400 Fahrenheit). Line the frozen tart shell with aluminium foil, fill with dried beans/rice/baking weights.

Bake until crust dries out, around 15 minutes.

Reduce heat to 180 degrees Celsius (350 Fahrenheit)

Remove foil and weights. Bake until the crust is golden brown, about 10 minutes. Transfer to wire rack and cool.

Pastry Cream (Créme Patisserie):

Ingredients:

1 ½ cups (375 ml) whole milk

1 vanilla bean, halved length ways and scraped

4 large egg yolks

½ cup (125g) sugar

2 tablespoons cornstarch

2 tablespoons unsalted butter

Method:

In a saucepan over a medium heat warm the milk and vanilla bean pod and scrapings until small bubbles appear along the edges of the pan. Remove from heat, then remove the pod.

In a bowl, whisk together the egg yolks, cornstarch, and sugar until smooth. Slowly whisk in the hot milk until blended. Pour the mixture back into the saucepan and place over a medium-low heat. Cook, whisking constantly, until mixture comes to the boil and thickens, about three minutes. Cook for a further minute. Pour through a fine-meish sieve into a clean bowl. Cover the bowl with plastic wrap, poke a few holes in the wrap. Refrigerate until well chilled, at least 2 hours.

3 tablespoons seedless strawberry or raspberry jam.

About 25 strawberries, hulled.

To assemble:
Melt the jam in a microwave on medium power. Fill the tart shell with the pastry cream. Carefully arrange the strawberries, pointed end up and close together, on top of the filling. Brush strawberries with melted jam. Refrigerate until cold.

I thought this was a really, really nice tart, and was quite proud of it if I do say so myself. The cream wasn't too rich but still creamy and satisfying. I would have perhaps liked it to be a little more solid to prevent the contense of the tart sliding out of the case once cut, but sacrafices must be made.